How to Send Online Invitations
Create and Send Beautiful Digital Invitations in Just a Few Clicks
Whether you’re planning a birthday party, baby shower, or holiday event, sending online invitations is the fastest and easiest way to get your event started. With Punchbowl’s invitation maker, you can design, personalize, and send professional-looking online invitations — all without printing or postage.
Follow these simple steps to send your online invitation in minutes.
Step 1: Sign In or Create an Account
To begin, head to Punchbowl.com and either:
- Sign in to your account, or
-
Create a new account if you’re a first-time user.

Step 2: Choose Your Design
From the homepage, browse themes and designs that match your event. You can search for birthday invitations, holiday parties, baby showers, and more.
When you find the perfect template, click “Personalize Design” to start customizing — or click “Back to Gallery” if you’d like to explore more options.

Step 3: Enter Your Event Details
Next, add your event information, including:
- Event Type (e.g., Invite with RSVP, Save the Date without RSVP)
- Event Title
- Date & Time
- End Time (optional)
- Guest of Honor’s Age (if applicable)

Step 4: Add Host and Location Information
Fill in your Host Name, Email, and optional Phone Number.
Then, enter your Event Location:
- Location Name, Address, City, State, ZIP
-
Or toggle “Virtual Event” for online gatherings.
If there’s more you’d like to include — such as attire suggestions, venue information, or co-host contact information — add it under Additional Information. This text will appear beneath your invitation when guests open it.
Step 5: Add Your Guest List
Once your invitation looks great, it’s time to add your guests. You can manually enter names and contact info, upload contacts from a file, or select contacts from a previous event hosted on Punchbowl. Learn about all your options in this help article.

Step 6: Configure Invitation Options
Before sending, review your Invitation Options:
- Show Guest List: Choose whether guests can see each other’s names and RSVPs.
- Allow Guests to Bring Others: Specify how many additional guests are allowed.
- Send Automatic Reminders: Customize when and to whom reminders are sent.
- Customize Message: Edit the subject line and greeting for email invitations.
- Enable Guest Messaging: Determine whether guests can send you private messages.
- Add a Gift Registry, Potluck, or Gift Ideas to help guests prepare.
You can also take advantage of tools in the Advanced Features tab, including:
- Setting an RSVP due date
- Allowing guests to forward the invite
- Tracking adults, children, and infants
- Limiting the number of attendees
- Requesting contributions
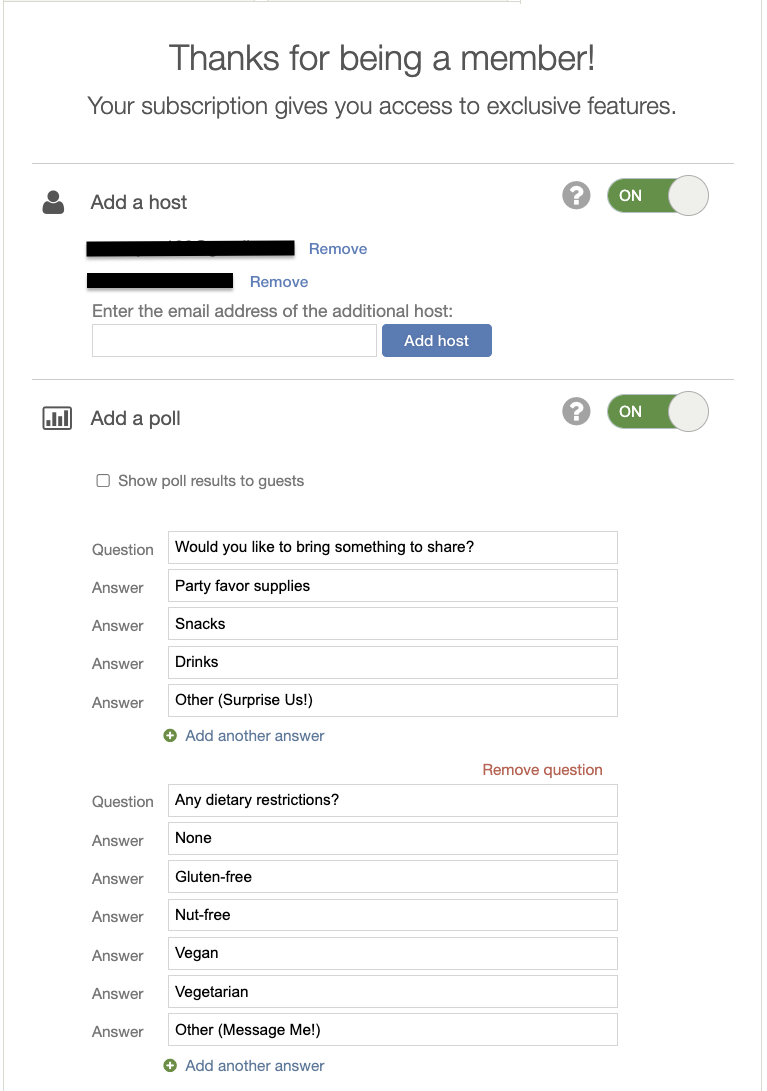
Step 7 (Optional): Explore Member Features
If you have a Punchbowl membership (Platinum or Premium), you’ll unlock exclusive tools to make event planning even easier:
- Add one or more co-hosts
- Create a poll for guests
- Schedule recurring events
-
Remove advertising for a cleaner experience (Platinum Membership Required)

Step 8: Send a Test or Deliver Your Invitation
Before sharing your invitation, send a test invite to yourself to make sure it looks perfect. Then click Send Now — and watch the RSVPs roll in!
Your guests will receive a beautiful online invitation that’s easy to open and respond to from any device.

If you have additional questions about creating or sending your online invitation, please reach out to help@punchbowl.com for assistance.